|
|
|
|
|
|
|
|

|
Don't Miss Any Special Deals - Sign Up To Our Newsletter!
|
||||||||||||
|
|
Have you seen our other related postcard collections - military and aviation art? |
|
 Hundreds
of military art postcards depicting events from military history from
ancient Egypt and Roman times through the centuries to the present day. Hundreds
of military art postcards depicting events from military history from
ancient Egypt and Roman times through the centuries to the present day. |
 A
huge selection of aviation art postcards featuring the best known aircraft
from military aviation history, including the aircraft of the first world
war, world war two and more modern aircraft. A
huge selection of aviation art postcards featuring the best known aircraft
from military aviation history, including the aircraft of the first world
war, world war two and more modern aircraft. |
| Navigation | |
| Page 1 of 19 | Page 1 .. Next |
|
|
|
|
|
|
|
|
|
|
|
|
|
|
|
|
|
|
|
|
|
| Navigation | |
| Page 1 of 19 | Page 1 .. Next |
| Text for the above items : |
U-99 by Ivan Berryman. (PC) Famed for his night time surface attacks on convoys, Otto Kretschmer, commanding U-99 is shown having claimed another victim beneath a full moon during the Summer of 1940. |
One Way Trip by Ivan Berryman. (PC) Having strung their deadly payload from the bilge keels of another victim, the two man crew of an Italian SLC, or Maiale, prepare to make their getaway in the murky waters of an Allied harbour in the early part of WW2. Having set clamps on the bilge keels, the nose of the manned torpedo was detached and suspended on a steel cable strung between the clamps. A timer was set in motion and, a little over two hours later, the resulting explosion would rip through the ship's hull. Such was the fate of the British battleships HMS Queen Elizabeth and HMS Valiant as they lay in the harbour at Alexandria on 3rd December 1941. The fate of the frogmen was rarely a good one, most attacks resulting in almost certain capture - and often death - as there was no way back to the 'mother' submarine and they were forced to make their own way to whatever sanctuary they could find, having completed their audacious mission. |
Jean Bart by Randall Wilson (PC) Jean Bart in company with Richelieu loose off salvoes on the gunnery range in the Med. |
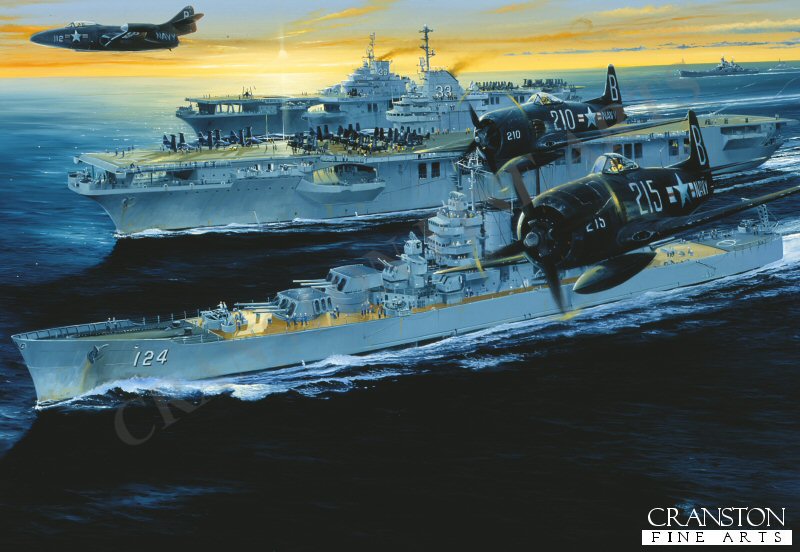
USS Kearsarge by Randall Wilson. (PC) USS Kearsarge CV33, USS Princeton and USS Rochester CA124 in Korea 1952 with bearcats over the top. |
HMS Valiant , Battle Wagons by Randall Wilson. (PC) HMS Valiant on Officer of the Watch Manoeuvres off the south coast. |
HMS Renown by Randall Wilson (PC) HMS Renown shown at full speed operating in Norwegian waters on the hunt for Scharnhorst and Gneisenau. |
The Wreck of the Birkenhead 1852 by Charles Dixon. (PC) The surviving soldiers mustered and awaited their officers' orders. Salmond ordered Colonel Seton to send men to the chain pumps; sixty were directed to this task, sixty more were assigned to the tackles of the lifeboats, and the rest were assembled on the poop deck in order to raise the forward part of the ship. The women and children were placed in the ship's cutter, which lay alongside. Two other boats were manned, but one was immediately swamped and the other could not be launched due to poor maintenance and paint on the winches, leaving only three boats available. The two large boats, with capacities of 150 men each, were not among them.The surviving officers and men assembled on deck, where Lieutenant-Colonel Seton of the 74th Foot took charge of all military personnel and stressed the necessity of maintaining order and discipline to his officers. As a survivor later recounted: 'Almost everybody kept silent, indeed nothing was heard, but the kicking of the horses and the orders of Salmond, all given in a clear firm voice.' Ten minutes after the first impact, the engines still turning astern, the ship struck again beneath the engine room, tearing open her bottom. She instantly broke in two just aft of the mainmast. The funnel went over the side and the forepart of the ship sank at once. The stern section, now crowded with men, floated for a few minutes before sinking.Just before she sank, Salmond called out that 'all those who can swim jump overboard, and make for the boats'. Colonel Seton, however, recognising that rushing the lifeboats would risk swamping them and endangering the women and children, ordered the men to stand fast, and only three men made the attempt. The cavalry horses were freed and driven into the sea in the hope that they might be able to swim ashore.The soldiers did not move, even as the ship broke up barely 20 minutes after striking the rock. Some of the soldiers managed to swim the 2 miles (3.2 km) to shore over the next 12 hours, often hanging on to pieces of the wreck to stay afloat, but most drowned, died of exposure, or were killed by sharks. 'I remained on the wreck until she went down; the suction took me down some way, and a man got hold of my leg, but I managed to kick him off and came up and struck out for some pieces of wood that were on the water and started for land, about two miles off. I was in the water about five hours, as the shore was so rocky and the surf ran so high that a great many were lost trying to land. Nearly all those that took to the water without their clothes on were taken by sharks; hundreds of them were all round us, and I saw men taken by them close to me, but as I was dressed (having on a flannel shirt and trousers) they preferred the others. I was not in the least hurt, and am happy to say, kept my head clear; most of the officers lost their lives from losing their presence of mind and trying to take money with them, and from not throwing off their coats.' - Letter from Lieutenant J.F. Girardot, 43rd Light Infantry, to his father, 1 March 1852 The sinking of the Birkenhead is the earliest maritime disaster evacuation during which the concept of 'women and children first' is known to have been applied. 'Women and children first' subsequently became standard procedure in relation to the evacuation of sinking ships, both in fiction and in real life. The synonymous 'Birkenhead drill' became an exemplar of courageous behaviour in hopeless circumstances, and appeared in Rudyard Kipling's 1893 tribute to the Royal Marines, 'Soldier an' Sailor Too': To take your chance in the thick of a rush, with firing all about, Is nothing so bad when you've cover to 'and, an' leave an' likin' to shout; But to stand an' be still to the Birken'ead drill is a damn tough bullet to chew, An' they done it, the Jollies -- 'Er Majesty's Jollies -- soldier an' sailor too! Their work was done when it 'adn't begun; they was younger nor me an' you; Their choice it was plain between drownin' in 'eaps an' bein' mopped by the screw, So they stood an' was still to the Birken'ead drill, soldier an' sailor too |
Prinz Eugen by Ivan Berryman (PC) The heavy cruiser Prinz Eugen slips quietly through the waters of Kiel Harbour as one of her own Arado Ar.196s flies overhead. In the background; Bismarck, wearing her Baltic camouflage, is alongside taking on supplies. |
Hotspur by Anthony Saunders. (PC) HMS Hotspur is shown on Convoy protection duties during 1942 / 1943. HMS Hotspur, the H class destroyer, was built by Scotts at Greenock and launched 23rd March 1936. Participated in the first Battle of Narvik, April 1940 and the Battle of Cape Matapan in March 1941. In April 1941 took part in the evacuation of Greece and sank the German U-Boat U79 in the Mediterranean north of Sollum on 23rd December 1941. Sold to the Dominican Republic on 23rd November 1948 and renamed Trujillo. |
Return to Taranto by Ivan Berryman. (PC) The Italian destroyer Alfredo Oriani slips quietly through the open span of the swing bridge at Taranto after a long Mediterranean mission. This ship was present at the Battle of Matapan in March 1941 and was successful against Allied shipping during Operation Harpoon the following year. After the armistice, she was laid up at Malta and was eventually presented to the French navy at the end of the war as reparation, whereupon the Oriani was renamed D'Estaing and served under the French flag until 1954. |
HMS Kelly passes HMS Royal Sovereign by Ivan Berryman. (PC) The destroyer HMS Kelly passes close to the battleship HMS Royal Sovereign as she escorts a convoy in the Mediterranean near Malta. |
The Golden Age by Ivan Berryman. (PC) Depicting the short S45 Solent 2 G-AHIS (Scapa), BOAC Flying Boat, passing over the Queen Elizabeth on Southampton Water, Late 1940s |
HMS Cossack on convoy duty by Ivan Berryman. (PC) Built by Vickers Armstrong and launched on 8th June 1937, at the outbreak of War the Cossack served in Home waters and also in the Mediterranean. She was torpedoed and sunk by U.563 in the North Atlantic on the 23rd of October 1941. |
Sunset at Spithead by Randall Wilson. (PC) HMS Queen Elizabeth with other Royal Naval Battleships, Revenge and Ramillies. Surrounded by cruisers and destroyers ride at anchor for King George Vs last Jubilee Review of 1935. |
Sopwith 1 ½ Strutter by Ivan Berryman. (PC) The potential value of aircraft at sea had been proven as early as the Battle of Jutland in 1916 and many experiments were undertaken to provide all significant warships with their own aircraft for spotting and reconnaissance purposes. One solution widely adopted was the fitting of flying-off platforms to the main guns, as demonstrated here, as a Sopwith 1½ strutter is launched from HMS Warspite in 1919. |
Trafalgar Dawn by Graeme Lothian. (PC) First daylight on the 21st October, saw the Royal Navy fleets together at a distance of about 12 miles. The day looked fine, a heavy swell from the west gave warning of an approaching storm. As dawn broke HMS Victory, Nelsons flagship and the rest of the fleet could be found in a shapeless huddle, which soon resolved itself into two divisions. Thus the two fleets prepared themselves for the coming battle which commenced just before noon. |
Moonlight Despatch by Ivan Berryman. (PC) The role of the frigate in Nelson's navy was one of the most varied of all the ships of the line, but their great speed made them ideal as communications vessels, carrying vital despatches between ships, squadrons and the Admiralty. |
HMS Orpheus Departing Faslane by Ivan Berryman (PC) HMS Orpheus was an Oberon-class submarine and in 1964 HMS Orpheus joined the 3rd Submarine Flotilla based at Faslane, picture here in the Clyde estuary heading for the open sea on patrol. |
HMS Sickle by Ivan Berryman. (PC) An S-Class submarine of the Royal Navy, HMS Sickle took part in operations in the Mediterranean in the Second World War after an uneventful first patrol off Norway. On the morning of 23rd of April 1943, five days into her second war patrol, HMS Sickle intercepted the Italian merchant Mauro Croce as it left Spanish waters from Valencia. Two torpedoes were fired but passed under the target. Immediately the submarine surfaced and, as seen in this painting, opened fire with the 76mm deck gun, scoring 15 hits from 19 rounds fired before the weapon jammed. HMS Sickle dived and broke off the action, but Italians later claimed three killed and four wounded in their complaint that the attack happened in Spanish territory. That May, HMS Sickle went on to attack German U-Boat U-755 unsuccessfully, but next day torpedoed and sank U-303. On her 11th war patrol in June 1944, HMS Sickle disappeared and is thought to have been lost to mines while returning to Malta. |
Home Safe by Ivan Berryman. (PC) A Sea King helicopter landing on an Illustrious class carrier. |
HMS Mantis by Ivan Berryman. (PC) An Insect class river gunboat, HMS Mantis took part in operations on the River Tigris in modern-day Iraq in World War One. A British Army advance up the Tigris in 1915 took the town of Kut-al-Amara, but this army of more than 10,000 men were besieged by the Turks here, eventually surrendering in April 1916. With other river gunboats, HMS Mantis had attempted to help break the siege from early March 1916, and remained on the River Tigris until again called upon to assist an expedition in early 1917. As part of a fleet of nearly 20 river gunboats, HMS Mantis helped the forces of Sir Stanley Maude recapture Kut-al-Amara on 24th February 1917. The ship had a long career, briefly serving in north Russia during their civil war in 1919 before serving in China during the 1920s. Still operational at the beginning of World War Two, HMS Mantis was eventually scrapped in 1940. |
|
Contact Details |
|
Sign Up To Our Newsletter!
This website is owned by Cranston Fine Arts. Torwood House, Torwoodhill Road, Rhu, Helensburgh, Scotland, G848LE Contact: Tel: (+44) (0) 1436 820269. Email: cranstonorders -at- outlook.com
|
 |